In this article, we will discuss how to send messages from Salesforce in Slack using Flow.
If you don't have a workspace in Slack yet, it's time to create one. Slack documentation will help with this task.
To work with Slack in Salesforce, you need to integrate Slack workspace and Salesforce org. Let's start with the Salesforce environment. In Setup, go to Slack->Initial Slack Setup. You will see the following steps to set up Salesforce for Slack:
1. Accept the terms and conditions for the Salesforce Slack Integration Service.
2. Select the programs you want to make available to users (for example, Sales Cloud for Slack).
3. Go to the Permissions Sets tab. There a new one should appear - Sales Cloud for Slack. Assign it to your Salesforce user. This step is needed to give Slack access to Salesforce. Otherwise, you will receive an error, saying “You don’t have the user permissions to access this Slack app.”

4. Customize access to records according to your needs.
5. Go to Slack and download the Salesforce for Slack application or just follow this link: https://slack.com/apps/A03269G3DNE-salesforce-for-slack

6. If you see a Connect button, click it to integrate Slack workspace to your Salesforce organization. Sign in into your Salesforce org and click Allow.

You can check whether the connection is successful in two ways:
In the Messages tab, type /sfhq-connect and send the message. The answer should be:

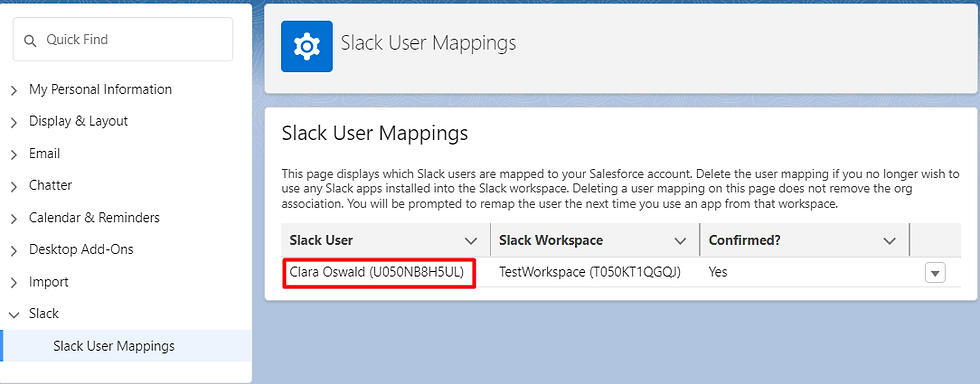
Сlick on the user icon in Salesforce and go to Settings-> Slack-> Slack User Mappings. You will see the connected Slack user there.

Congratulations! You have set up the Slack and Salesforce integration. Now we can move on to creating the Flow. In this article, we'll take a look at how to send messages in Slack using Record-Triggered Flow and Screen Flow.
Send messages from Salesforce in Slack:
Record-triggered Flow creation
Let's say we need to send a message in Slack when an Account is updating. So, we choose the Record-Triggered Flow for updating the Account.
Since this is a Record-Triggered Flow, it is impossible to do any actions with Slack in the Run Immediately path, so let's create a Scheduled Path and select the shortest execution time - 1 minute after the record is updated. Time Source select Account: Last Modified Date.

Next, we add the Action element. In the Slack tab, select Send Slack Message.


Slack App field. Select the connected app in Slack; in our case, it is Salesforce for Slack.
Slack Workspace field. Select your connected workspace.
Execute Action As field. Select Slack App.
Slack Message field. Write the message you want to send or create a Text Template resource.
The Slack Conversation ID field. Enter the ID of the Slack channel (you can find it by right-clicking on the channel, then selecting Views channel details on the About tab at the bottom, you will find the channel ID).

Or just copy the Slack channel link. That's how it looks like: https://app.slack.com/client/workspaceID/channelID

Note: If you want to message a person personally, then the user's Channel ID will not work. If you run the Flow through Debug, you will get a channel_not_found error.
To send a message to a specific user, go to the user's Salesforce Settings, find the Slack Mapping Users tab, and copy the Slack User Id. If there is no needed user, then that user should be connected via Slack, as we did when setting up the connection.
Now check if your Flow works correctly.

Congratulations, you've sent your first Slack message from the Salesforce environment!
Screen Flow creation
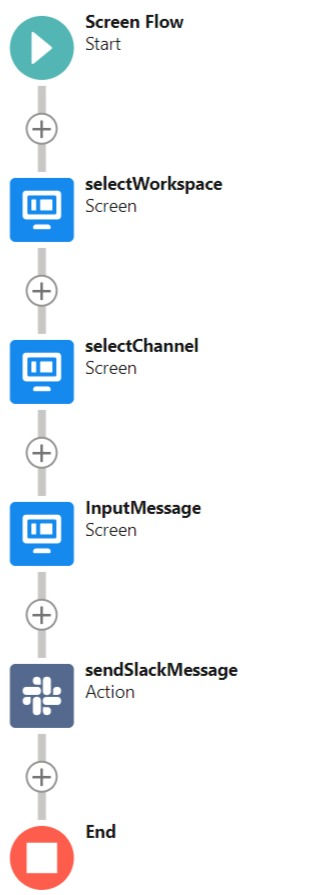
Now let's try to create Screen Flow. In this case, we can use the Slack Workspace selector and Slack Channel Selector screen components to be able to select the workspace and channel where we want to send messages without specifying a Channel ID.
The Flow consists of three Screen elements and one Action of sending a message to Slack.


Slack Workspace Selector has a Slack appID field - this is the Slack application id; it can be found in the application link. Find your application here: https://slack.com/apps.
For example, in this article, we used the Salesforce for Slack application: https://slack.com/apps/A03269G3DNE-salesforce-for-slack
Leave the rest of the fields as default.

For the Slack Channel Selector element:
Specify Slack app id and Slack workspace id as the selected variables from the previous screen.
Use Bot Token must be GlobalConstant.True to access the channel list.
Leave the rest of the fields as default.
To enter a message, add a Text element to the Screen.
Now you have finished creating screens. It remains to add Action: Send Slack Message.

Save the Flow, add it to the page Layout, and check the execution.

You will got the expected result.

Send messages from Salesforce in Slack: Conclusion
In this article, we discovered new opportunities of Slack and Salesforce integration. However, this is only the beginning of acquaintance. In addition to sending messages, you can do other things in Flow, for example: work with Slack channels, invite new participants, edit or attach messages, and much more. In the following articles, we will continue to explore the capabilities of Slack and Salesforce.

Let's unlock the full potential of Salesforce for your business
Our team has successfully implemented and customized Salesforce for many businesses, resulting in increased revenues and greater customer satisfaction. Let's talk about your case!

Comentários